Named Credentials Basics
Salesforce introduced Named Credentials in the Spring’15 release. A named credential specifies the URL of a callout endpoint and its required authentication parameters in one definition. Salesforce manages all authentication for Apex callouts that specify a named credential as the callout endpoint so that your code does not have to. If you instead specify a URL as the callout endpoint, you must register that URL in your org’s remote site settings and handle the authentication yourself. For example, for an Apex callout, your code handles authentication, which can be less secure and especially complicated.
It offloads the storage of credentials and authentication to a declaratively controlled process. You can also skip remote site settings, which are otherwise required for callouts to external sites, for the site defined in the named credential.
Why Avoid Hardcoding Credentials :
- It is a Maintenance nightmare. Having Credentials hardcoded means you have to deploy the changes every single time like when your password changes or expires.
- It is also difficult to maintain changes in a different environment
- Not very secure.
Benefits of using Named Credentials :
- Authentication is done by Salesforce and you need not to worry about that.
- Easy for admins to maintain.
- Secure storage of credentials.
- No need to create a Remote Site Setting if using a Named Credential.
- The callout is easier to maintain. No hard coding involved.
Define Named Credentials :
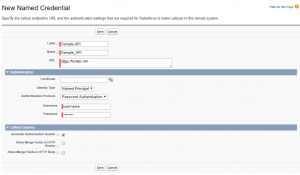
From Setup, enter Named Credentials in the Quick Find box, and then select Named Credentials.
Click New Named Credential, or click Edit to modify an existing named credential.
Complete the fields –
- Label – A user-friendly name for the named credential that is displayed in the Salesforce.
- Name – A unique identifier that is used to refer to this named credential from callout definitions
- URL – The URL or root URL of the callout endpoint.
- Identity Type – Determines whether you are using one set or multiple sets of credentials to access the external system.
- Anonymous: No identity and therefore no authentication.
- Per User: Use separate credentials for each user who accesses the external system via callouts.
- Named Principal: Use the same set of credentials for all users who access the external system from your org.
- Authentication protocol – Select the authentication protocol Password Authentication, OAuth 2.0, JWT, etc.
- Generate Authorization Header – By default, Salesforce generates an authorization header and applies it to each callout that references the named credential.
Deselect this option only if one of the following statements applies.
- The remote endpoint doesn’t support authorization headers.
- The authorization headers are provided by other means. For example, in Apex callouts, the developer can have the code construct a custom authorization header for each callout.
- Allow Merge Fields in HTTP Header, Allow Merge Fields in HTTP Body – These options enable the Apex code to use merge fields to populate the HTTP header and request body with org data when the callout is made.
Example :
Apex HTTP Callout Without Named Credential:
Basic Auth Example The Traditional Way –
HttpRequest req = new HttpRequest();
req.setMethod(‘POST’);
req.setEndpoint(‘https://example .com/path/my/api’);
String username = ‘username’;
String password = ‘password’;
//Add basic authentication header to the callout
Blob headerValue = Blob.valueOf(username + ‘:’ + password);
String authHeader = ‘BASIC ‘ + EncodingUtil.base64Encode(headerValue);
req.setHeader(‘Authorization’, authHeader);
Http h = new Http();
HttpResponse response = h.send(req);
System.debug(‘response-‘ + response);
Apex HTTP Callout With Named Credential:
Basic Auth Example With Named Credentials –
HttpRequest req = new HttpRequest();
req.setMethod(‘POST’);
req.setEndpoint(‘callout:Sample_API/some_path’);
//No need to manually set any headers here. Salesforce will add this for us automatically.
Http http = new Http();
HTTPResponse response = http.send(req);
System.debug(‘response-‘ + response);