External Services In Salesforce
Have you ever thought of making API integrations in Salesforce between different systems but lack in having coding knowledge? What if I say it is possible now to make API integrations without writing a single line of apex code?
Yes! It can be accomplished with the use external services and flows in Salesforce. In this blog I will tell how you can do integrations using external services in Salesforce with an example of a simple currency converter component.
External Services let’s you connect to a web service of your choice, and invoke methods based on the API schema via a flow. In this blog I’ll show you a step by step process of implementing enhanced external services in Salesforce org.
We will take an example of a simple currency converter component. The component would ask for three inputs:
- From Currency
- To Currency
- Amount to be converted
For this example we will be using free version of https://www.exchangerate-api.com/ API for currency conversion. You can get your free API key by signing in on the given URL.
The endpoint we are going to use is https://v6.exchangerate-api.com/v6/YOUR-API-KEY/pair/EUR/GBP/AMOUNT
Response Format: JSON
View the response here: https://www.exchangerate-api.com/docs/pair-conversion-requests
Steps To Implement External Services in Salesforce:
- Prepare a Schema for your API.
- Set Up a named credential for authentication.
- Create a new External service.
- Add the named credential.
- Import the schema definition.
- Save then external service.
You have apex actions ready to be used !
1- Preparing the Schema:
An API schema describes the operations of a RESTful API and the methods on how to interact with an API.
Supported Schema Format
- OpenAPI 2.0, JSON schema format
- UTF-8, with full character set for names and identifiers
We will be using the following schema for our component.
{
"swagger": "2.0",
"host": "v6.exchangerate-api.com",
"schemes": [
"https"
],
"info": {
"description": "defaultDescription",
"version": "0.1",
"title": "defaultTitle"
},
"paths": {
"/v6/{apikey}/pair/{from}/{to}/{amount}": {
"get": {
"produces": [
"application/json"
],
"parameters": [
{
"name": "apikey",
"in": "path",
"required": true,
"type": "string"
},
{
"name": "from",
"in": "path",
"required": true,
"type": "string",
"x-example": "USD"
},
{
"name": "to",
"in": "path",
"required": true,
"type": "string",
"x-example": "INR"
},
{
"name": "amount",
"in": "path",
"required": true,
"type": "string",
"x-example": 12
}
],
"responses": {
"200": {
"description": "Definition generated from Swagger Inspector",
"schema": {
"$ref": "#/definitions/Model0"
}
}
}
}
}
},
"definitions": {
"Model0": {
"properties": {
"result": {
"type": "string"
},
"documentation": {
"type": "string"
},
"terms_of_use": {
"type": "string"
},
"time_last_update_unix": {
"type": "integer",
"format": "int32"
},
"time_last_update_utc": {
"type": "string"
},
"time_next_update_unix": {
"type": "integer",
"format": "int32"
},
"time_next_update_utc": {
"type": "string"
},
"base_code": {
"type": "string"
},
"target_code": {
"type": "string"
},
"conversion_rate": {
"type": "number",
"format": "double"
},
"conversion_result": {
"type": "number",
"format": "double"
}
}
}
}
}
You can refer to the following URL for more information regarding schema. https://help.salesforce.com/articleView?id=sf.external_services_schema_examples.htm&type=5
Also there are many tools available on the internet which can help you creating open API schema for your API’s.
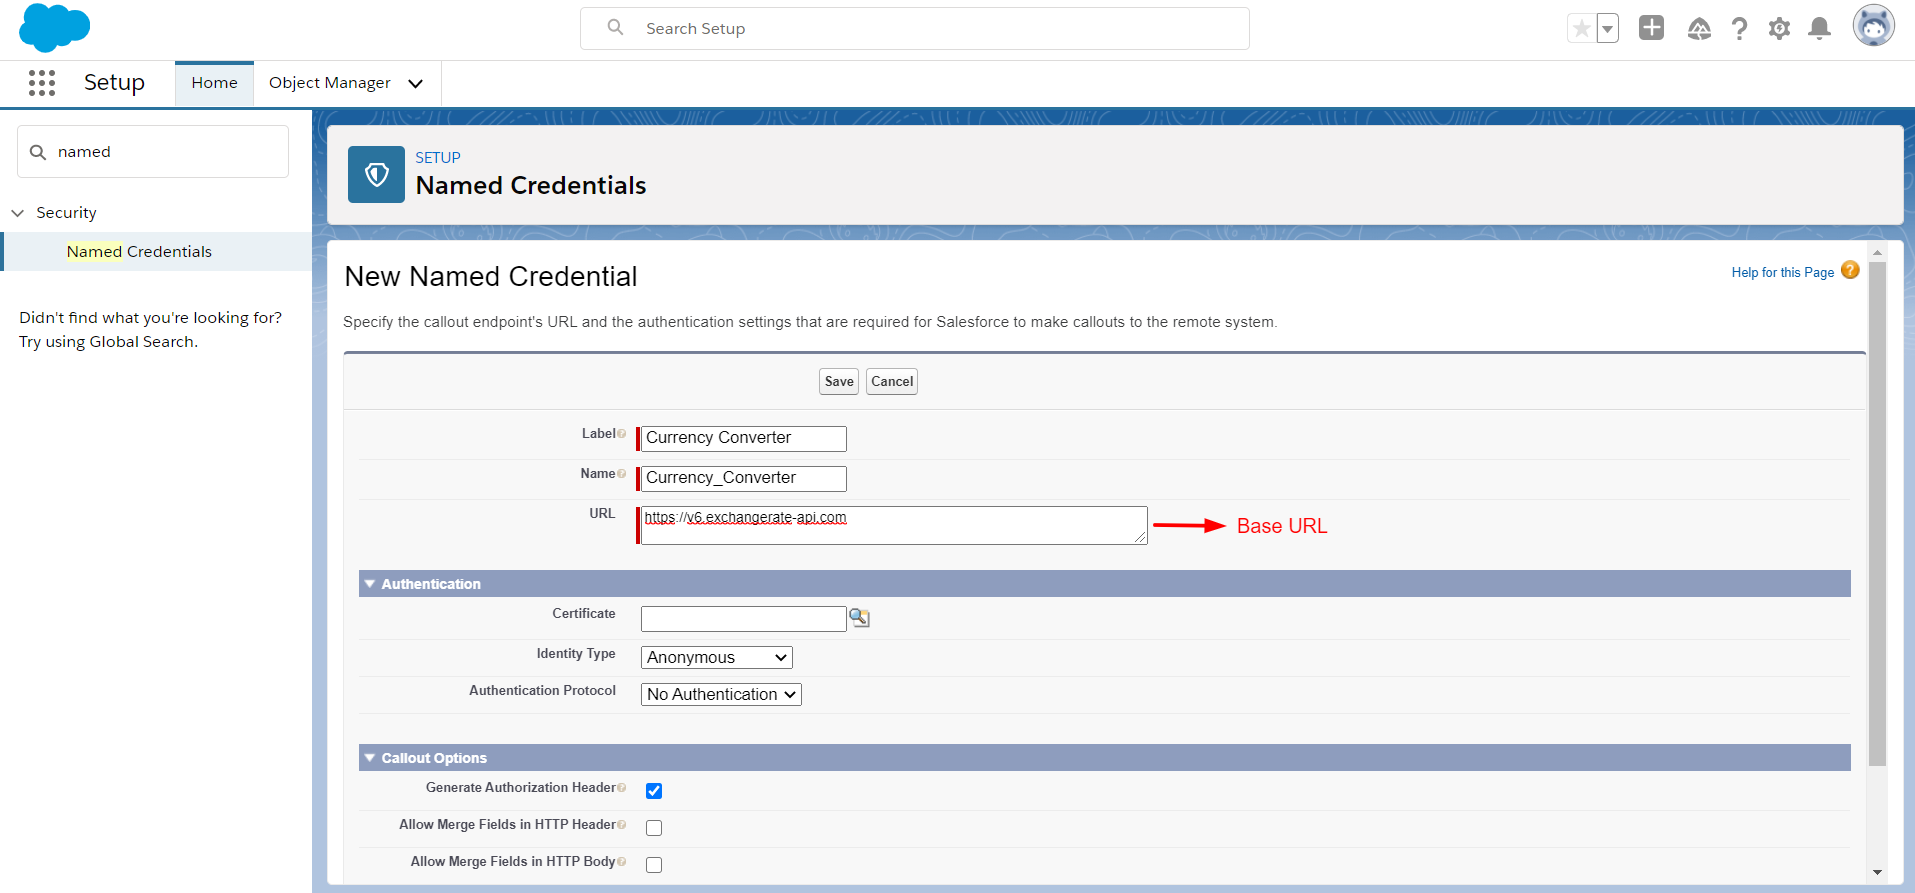
2- Setting Up Named Credential For Authentication:
- From Setup Enter Named Credentials.
- Click on New Named Credential.
- Enter a label and name.
- In the URL section, provide the base URL for your endpoint. In our case it is ‘https://v6.exchangerate-api.com’.
- Since our API simply requires the API key to be passed in the URL path itself, so select Identity type as ‘Anonymous’ and Authentication Protocol as ‘No Authentication’.
- Save the Named Credential.
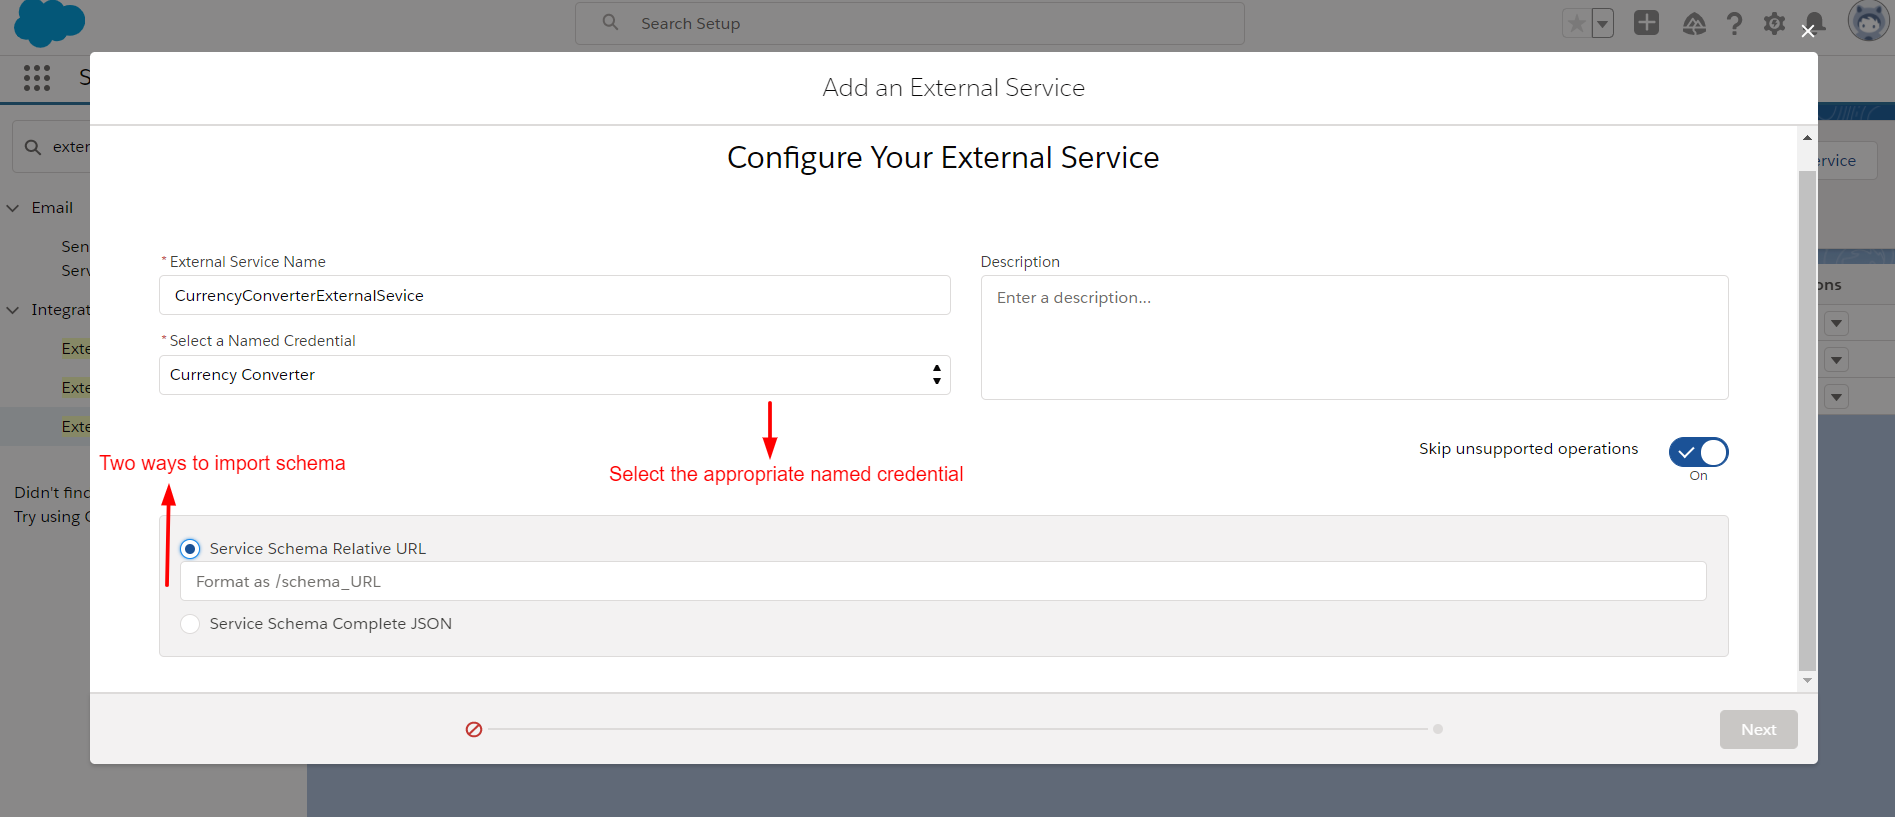
3- Create New External Service:
- From Setup Enter External Service and open.
- Enter the Service Name.
- Select the appropriate named credential.
- Import the schema. For this you have two options:
- Either provide the URL where your schema is located.
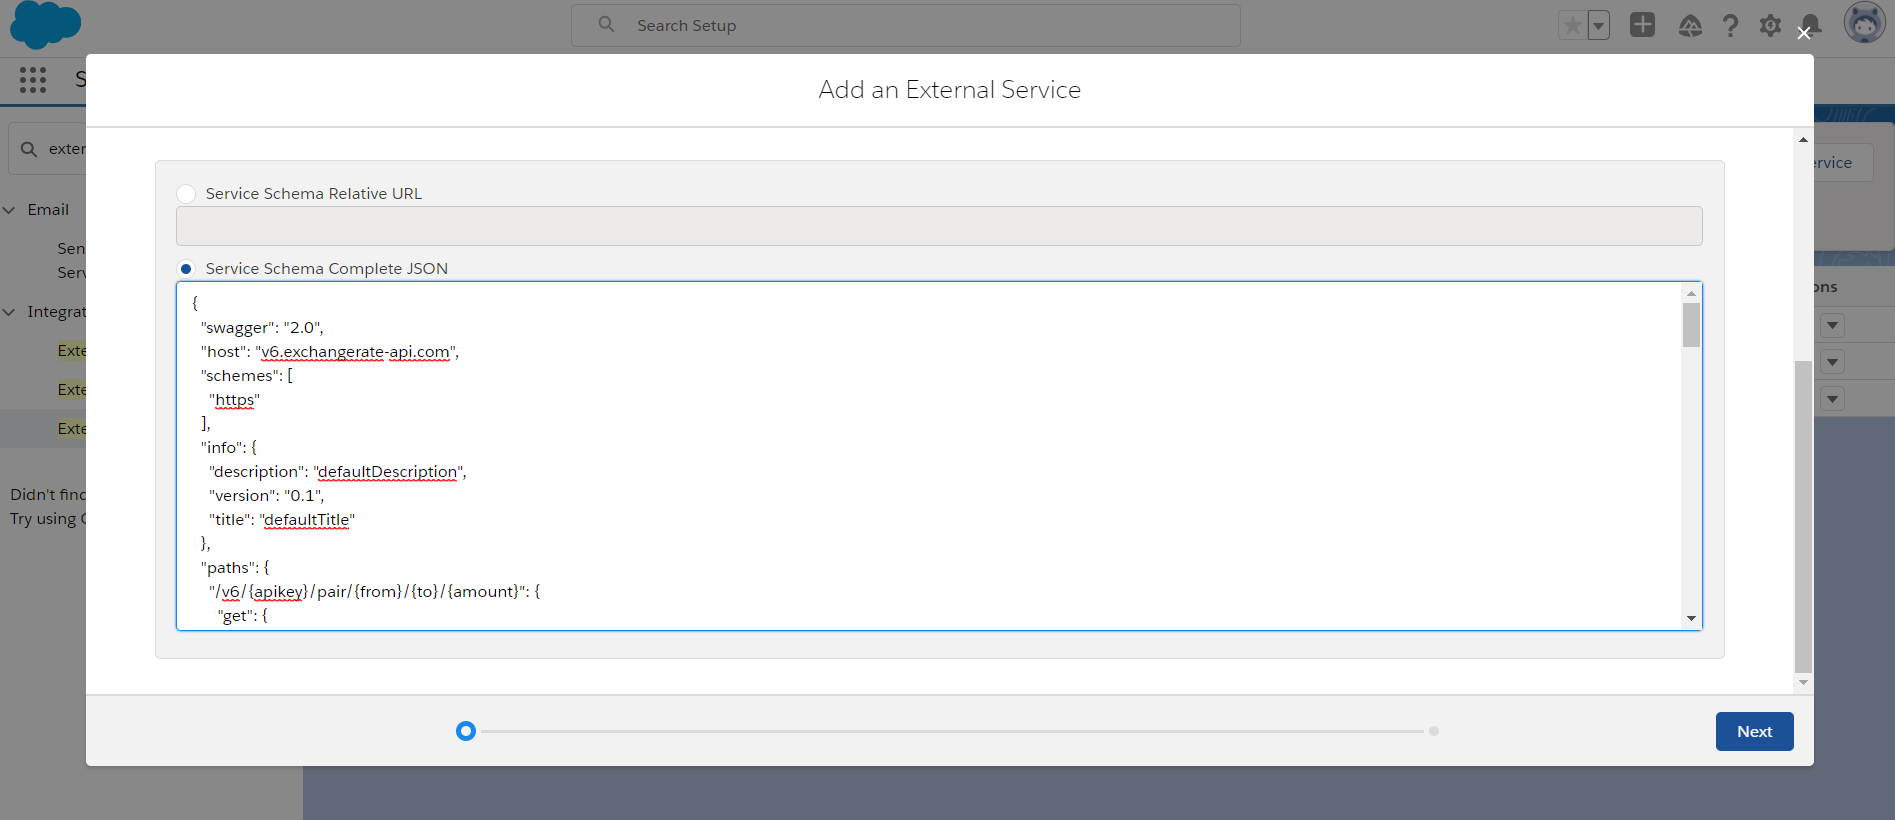
- Provide the JSON format of your schema in the box provided.
- For our case paste the JSON schema prepared in the first step in the given box.
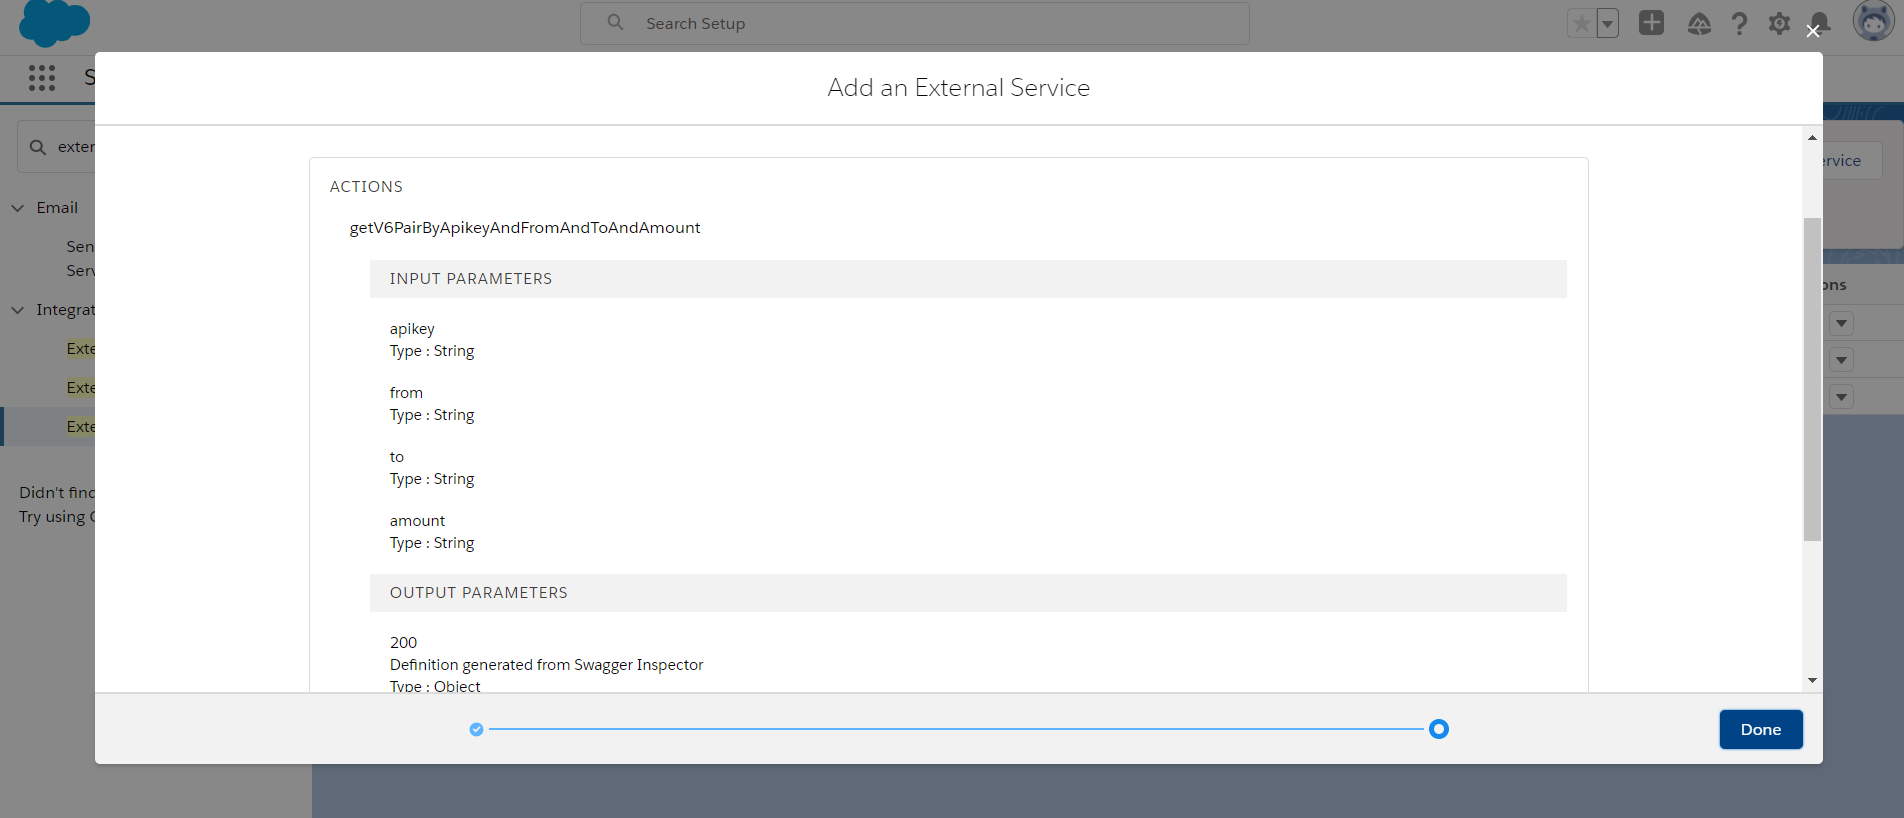
- Click Next, you’ll see the actions prepared from the schema.
- Click Done.
4- Using the Actions In A Screen Flow:
- From Setup Enter Flow and create a new Screen Flow.
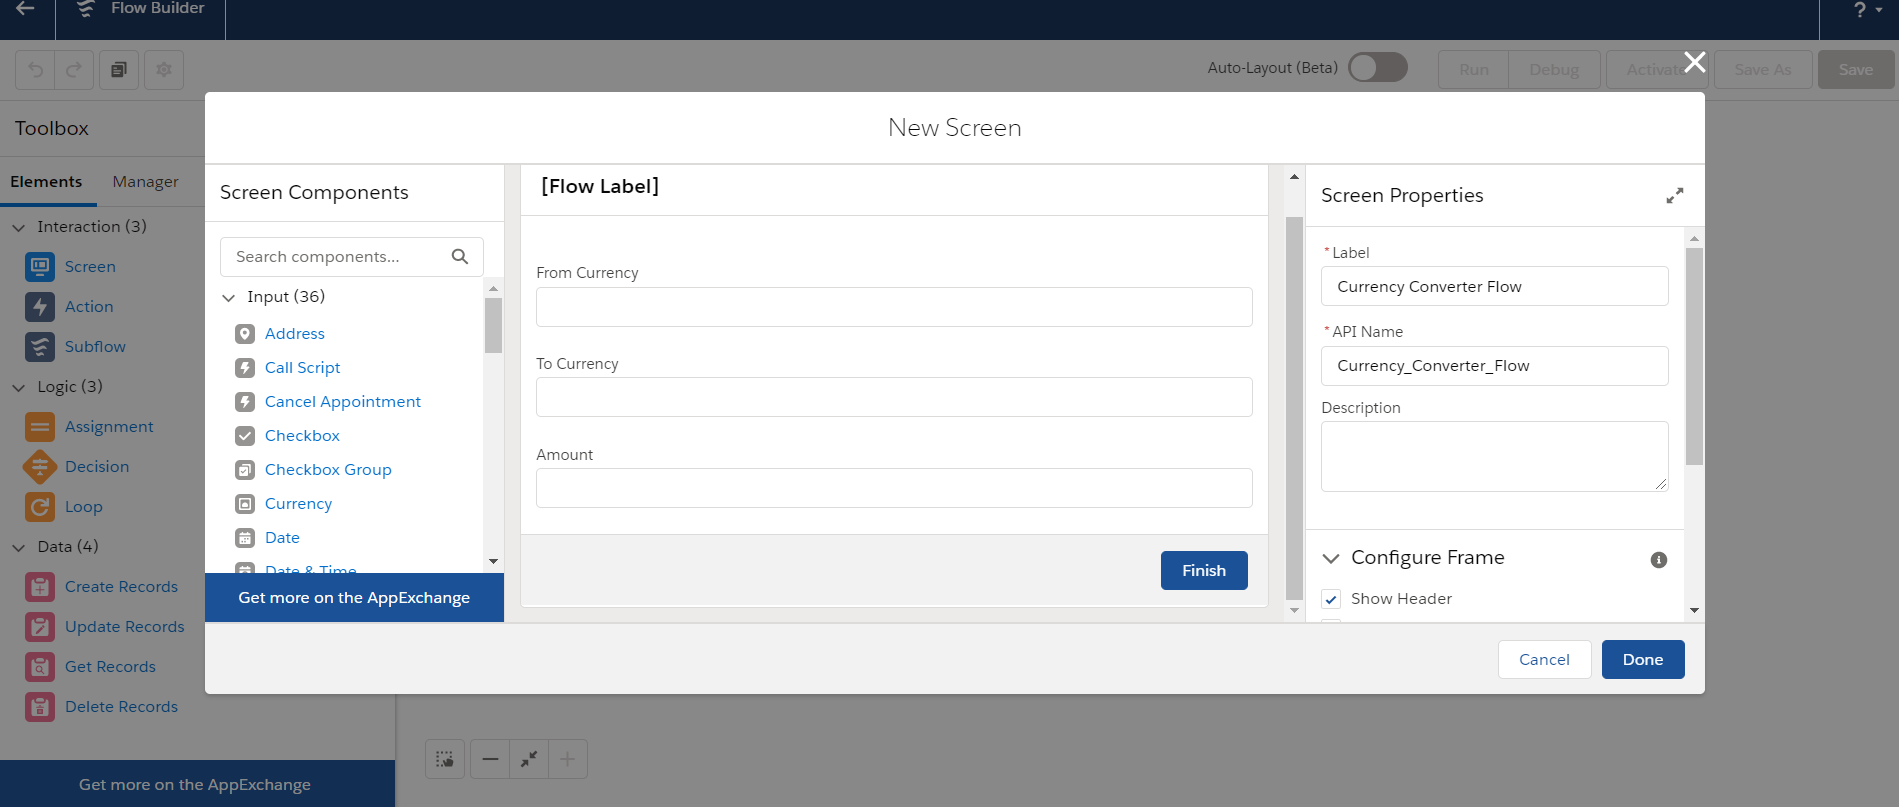
- Drag a screen element to the canvas for collecting inputs from the user.
- Drag three text inputs onto the screen Label them accordingly.
- Add a label and name for the screen and click on Done.
- Next drag the action element onto the canvas to use the external service actions.
- Filter the actions by type, select external services and select the action prepared from the external service we created before.
- Provide a label and name to the action.
- You will find the action requires four input parameters which we specified when we prepared our schema.
- Paste your API key in the api key input box.
- Also assign the screen component variable to the appropriate input.
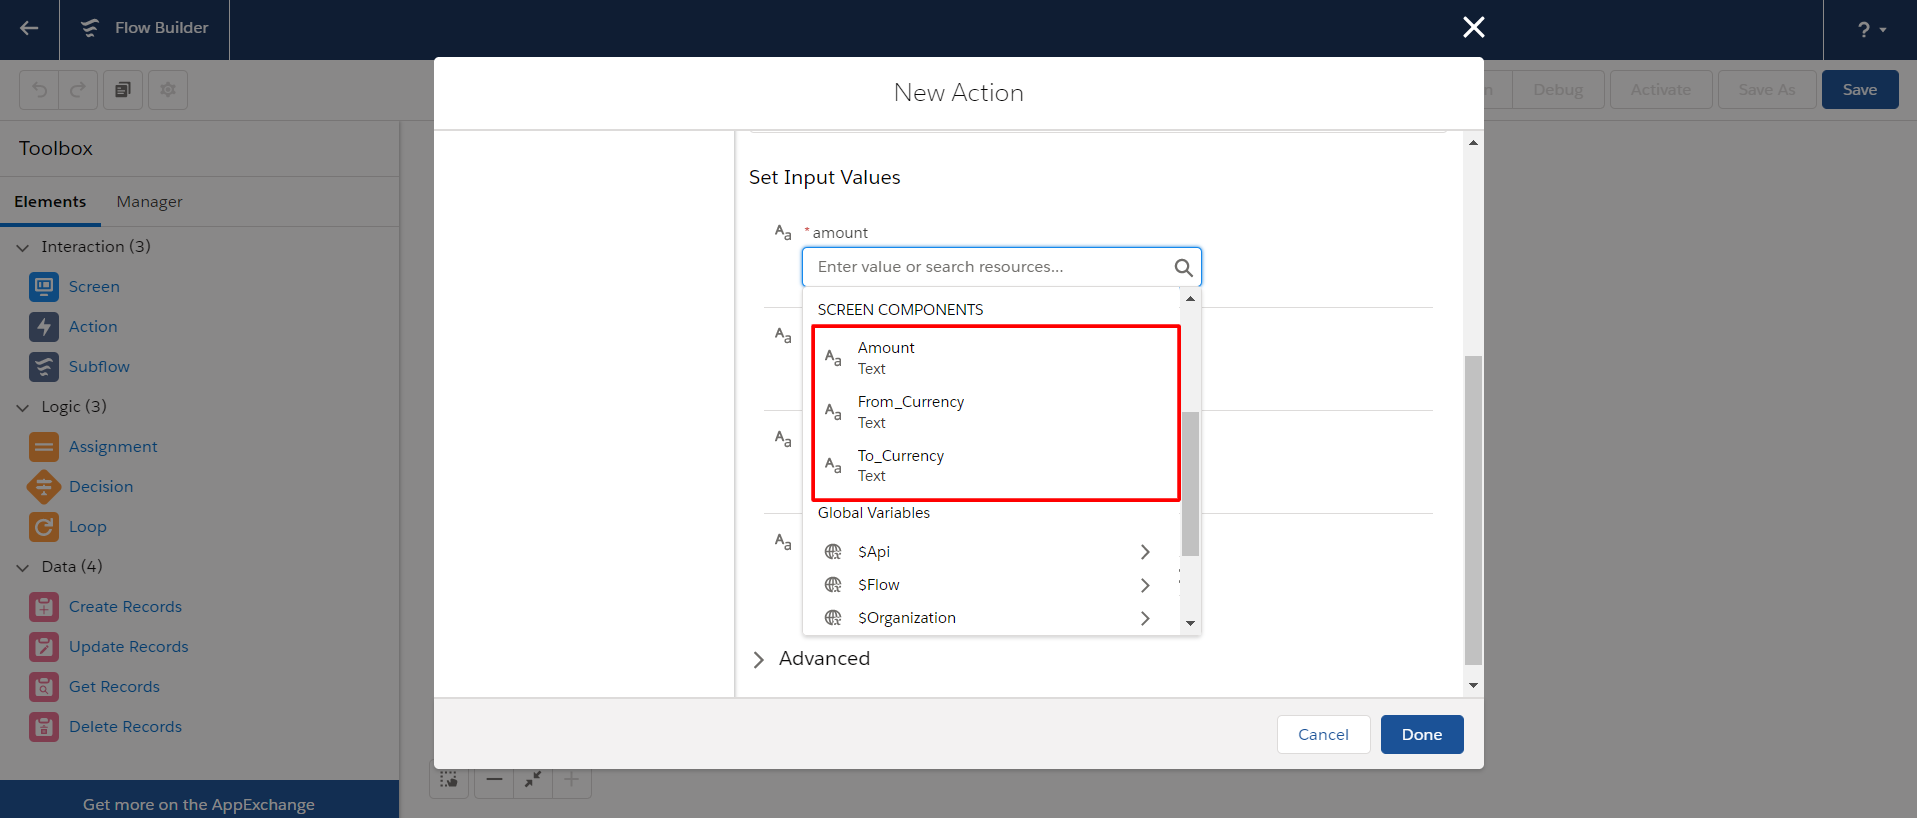
- For now your action looks something like this.
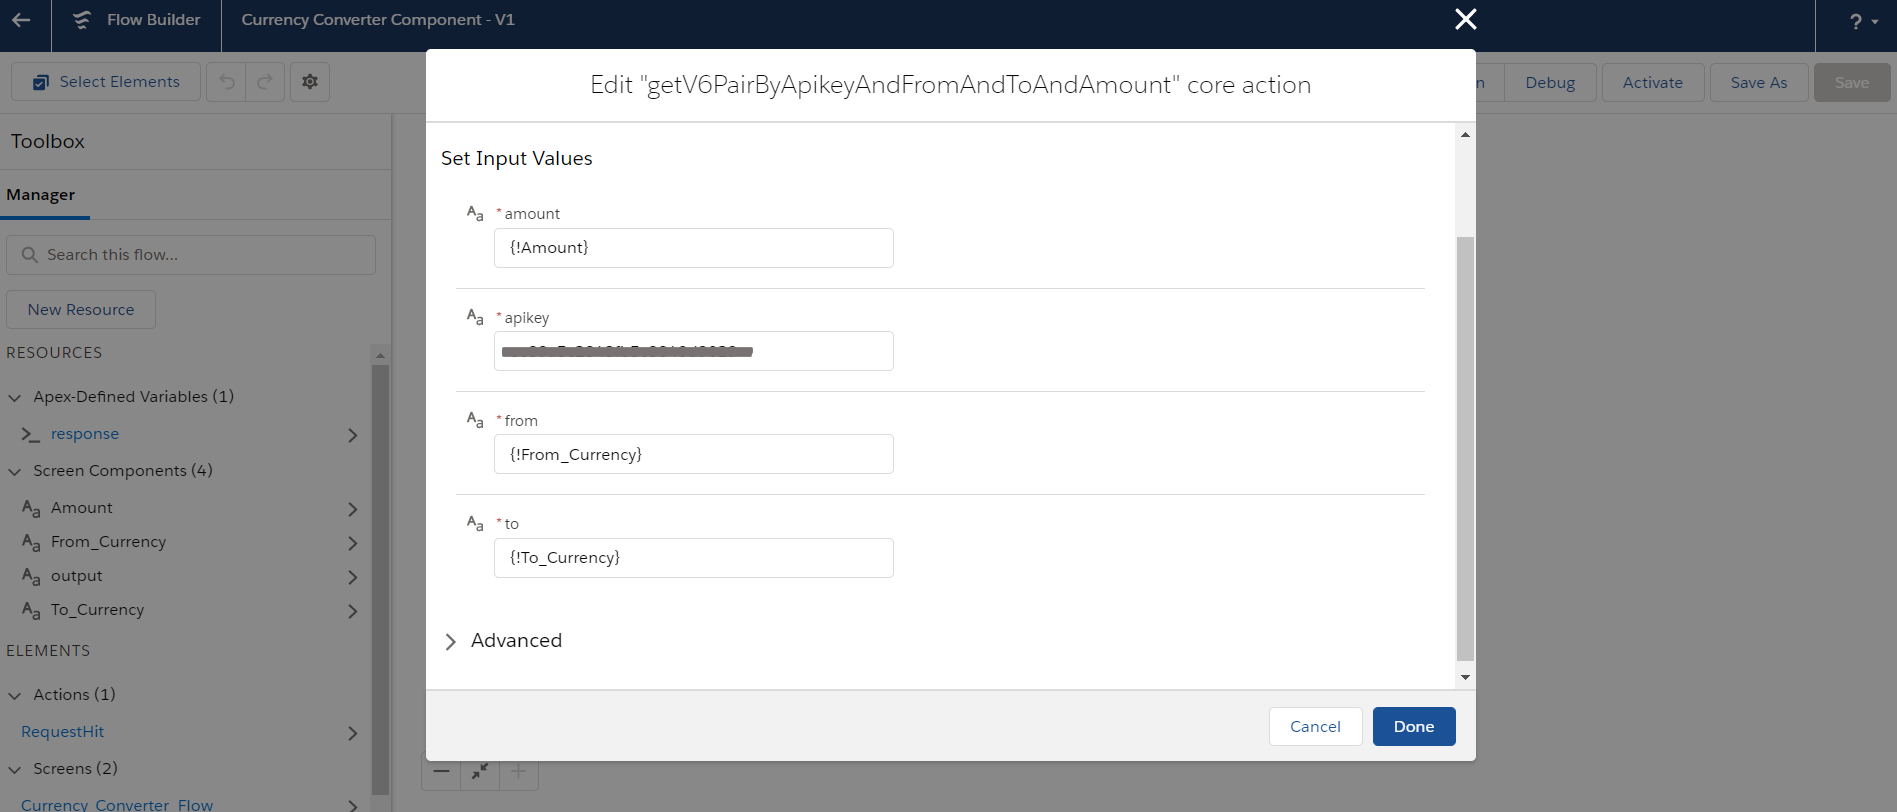
- Next click on Advanced to handle the successful responses i.e the output variables prepared from our schema.
- Select manually assign variables.
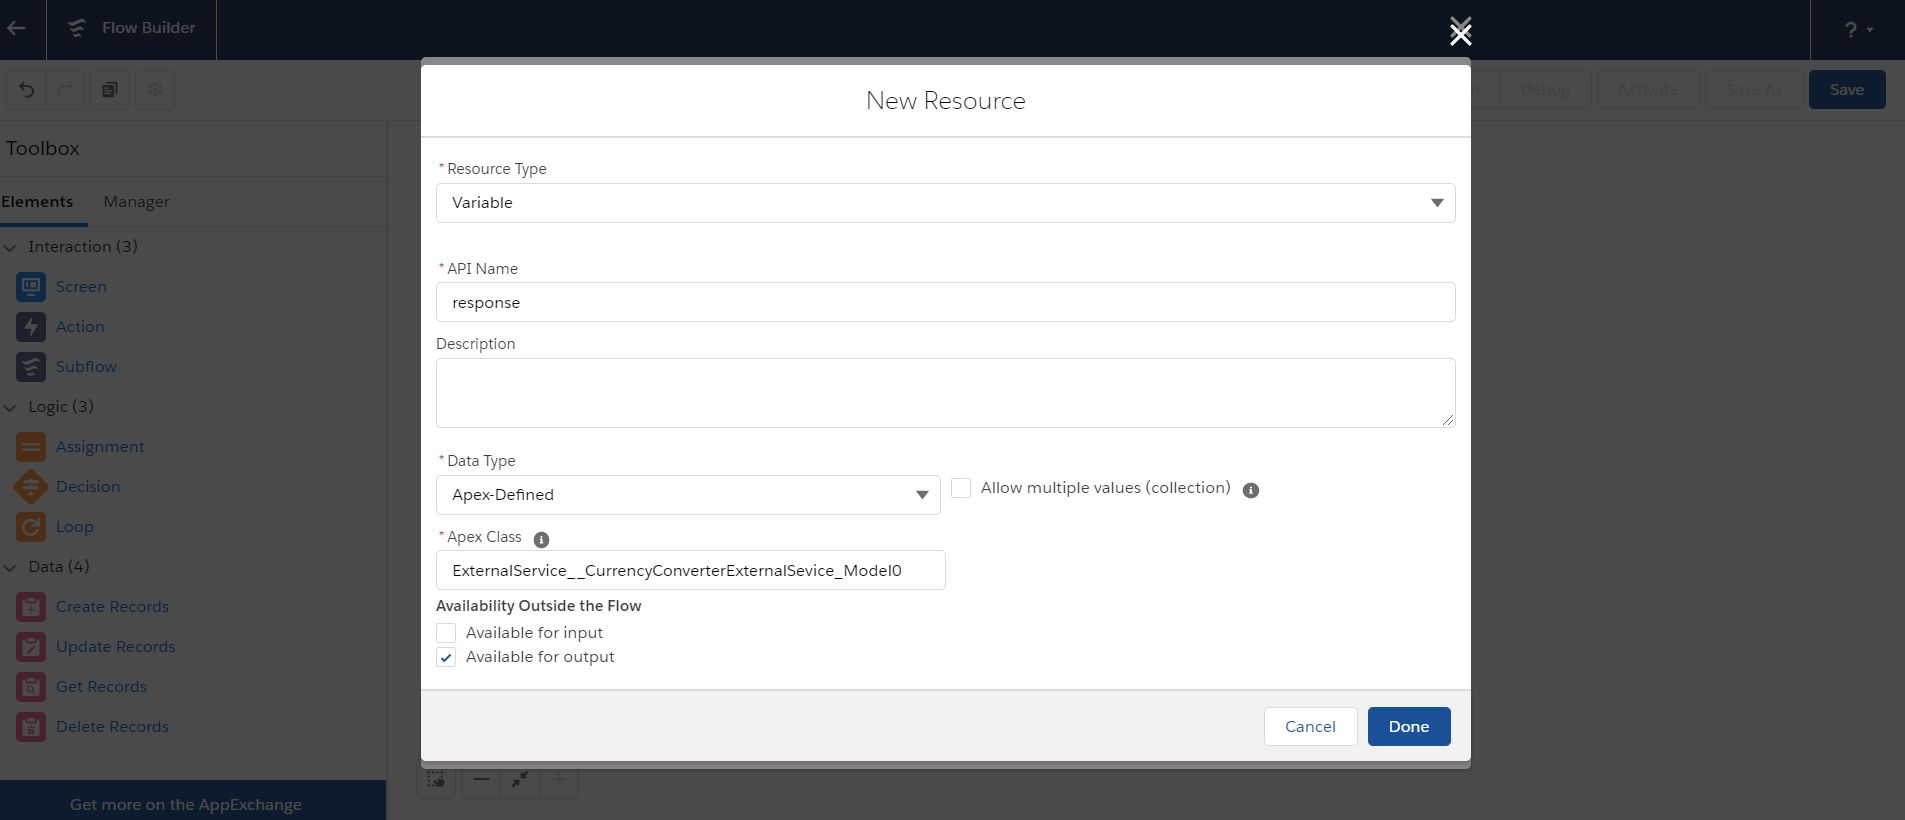
- For the 200 response create a new resource.
- Resource Type: Variable
- Provide a unique name for the variable.
- Data Type: Apex -Defined
- Select the appropriate apex class created on demand from external service. You can find the class named as ‘External__YOUR-SERVICE-NAME_Model0’. ‘Model0’ taken from the schema.
- Select Available for output and click Done.
- Click on Done to save the action.
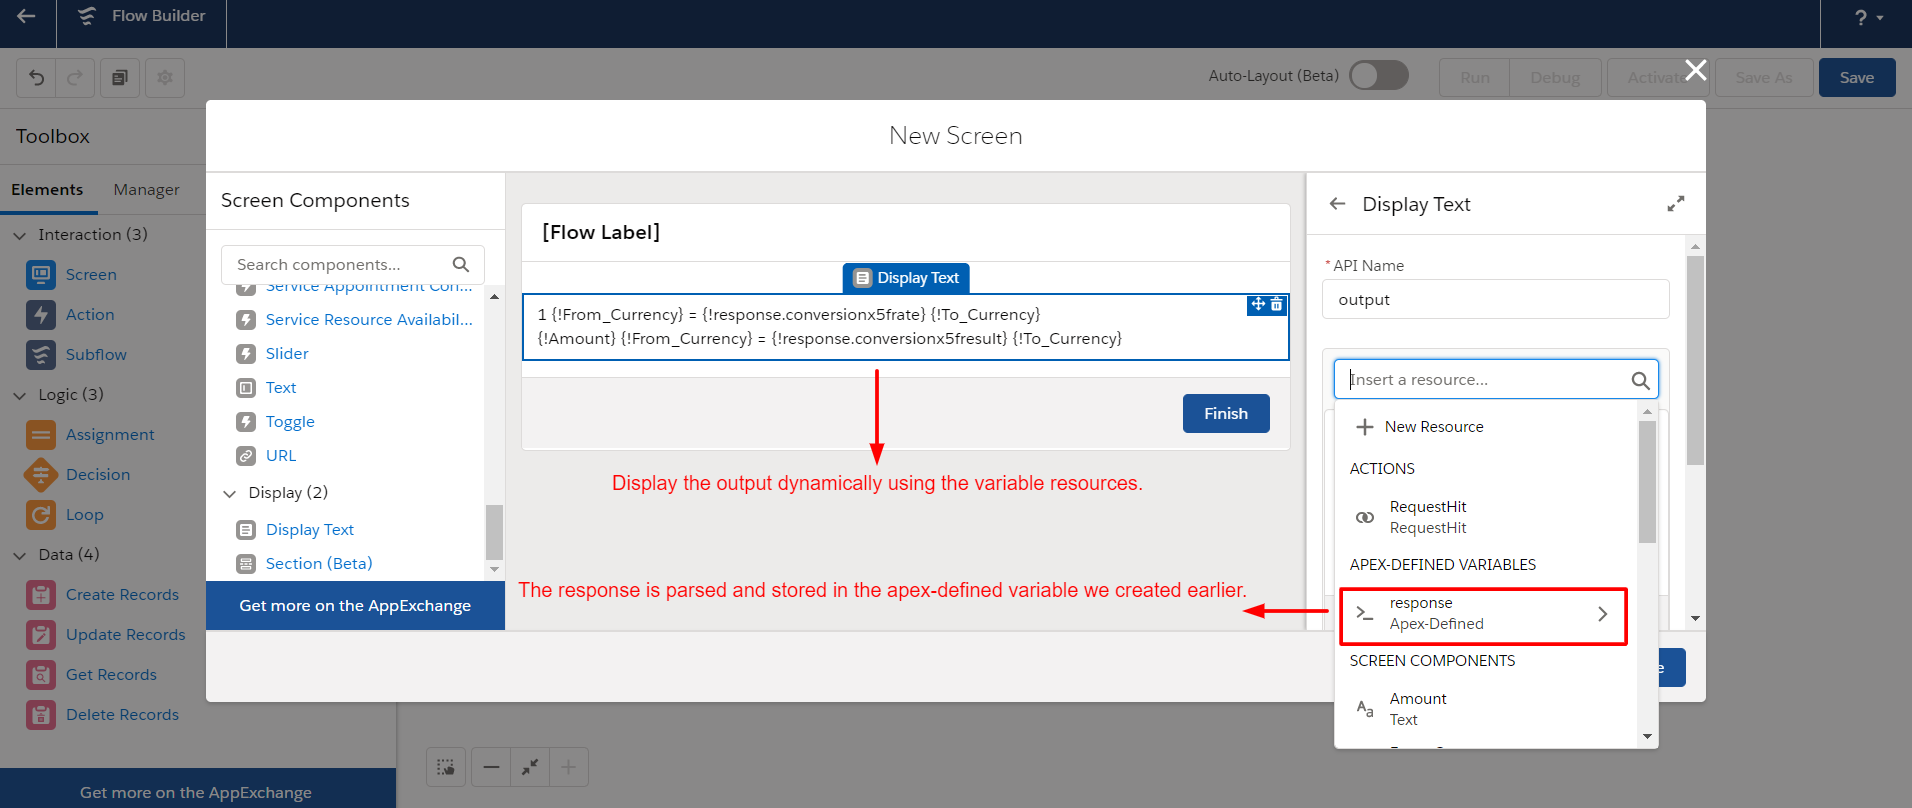
- Drag another screen element to the canvas to display the results.
- Use the apex-defined variable resource to access the response values returned. You can learn more about apex-defined variables in flow by clicking here https://help.salesforce.com/articleView?id=sf.flow_concepts_apex_type.htm&type=5 .
- Add a display text onto the screen and display the results as desired.
- Provide a label and name to the screen and click on Done.
- Finally connect the flow components, provide a flow label and name, save and activate the flow.
- You can also debug your flow before activating by clicking on the debug button.
- Finally this is how your flow looks like.
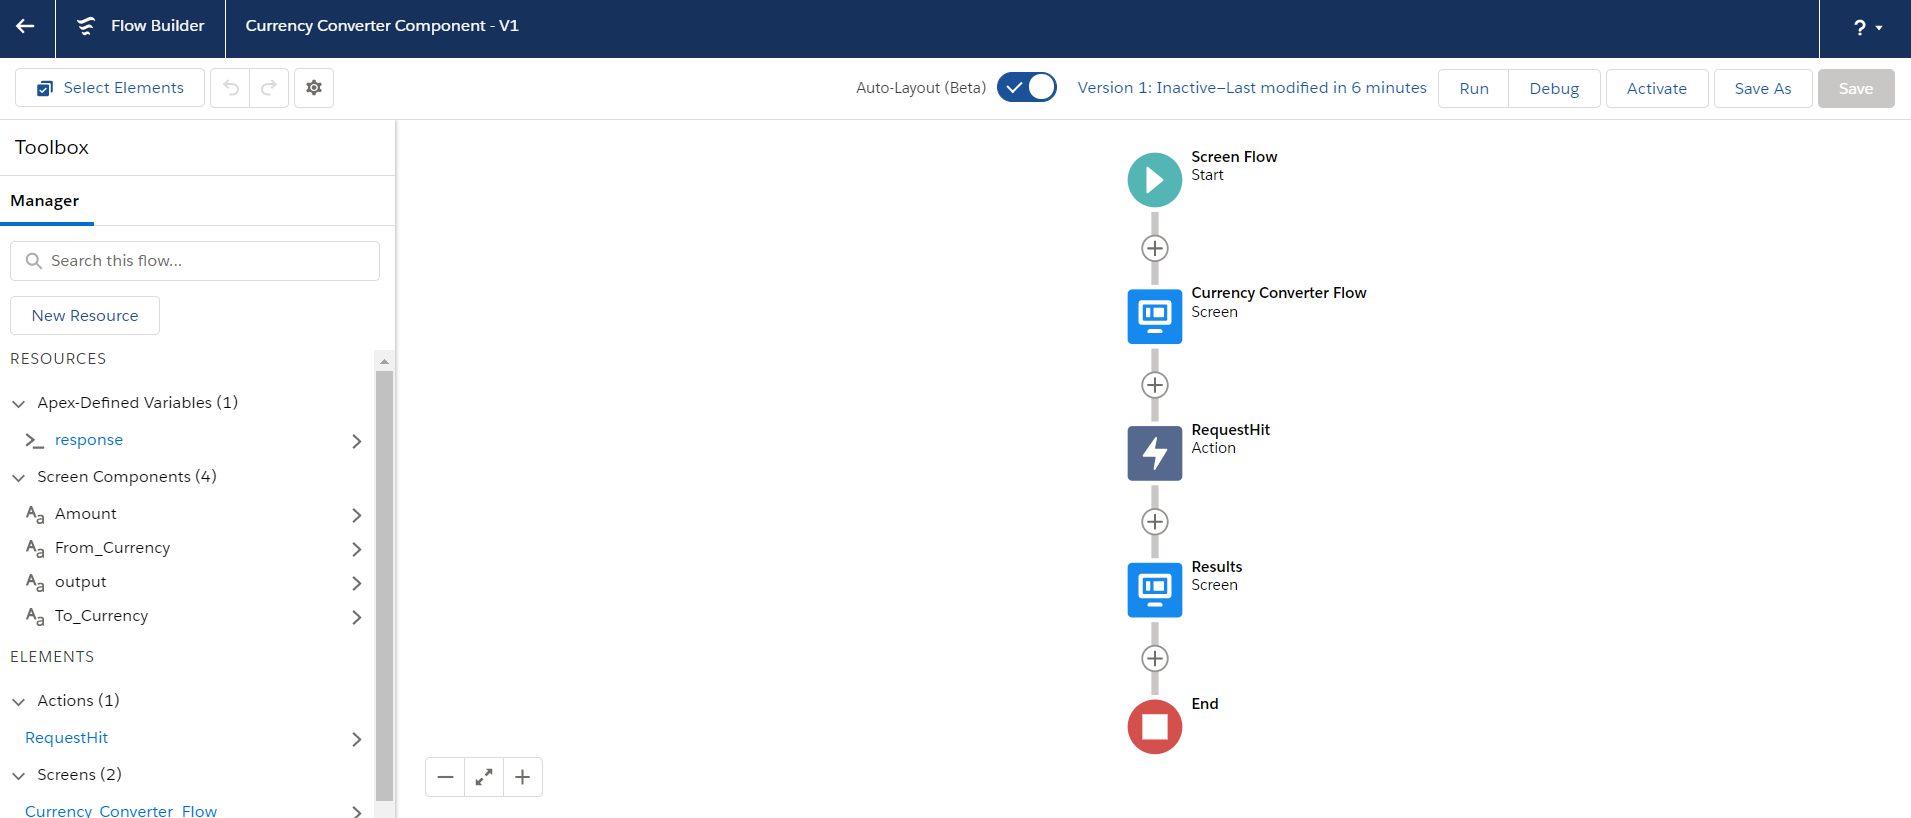
– You integrated an external system without writing a single line of code. Now place the flow on a lightning page and test it.
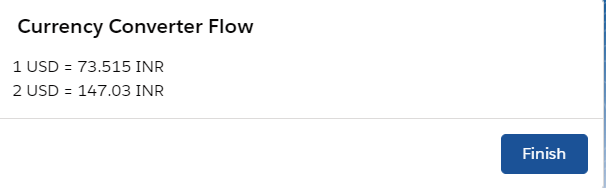
Results:

Note: External Services have some limits and you might have to move on to the programmatic approach for dealing to complex integration scenarios. You can refer to the Salesforce documentation for external service considerations .
https://help.salesforce.com/articleView?id=sf.enhanced_external_services_considerations.htm&type=5.